Developer Guide
- Acknowledgements
- Design
- Implementation
- Documentation, logging, testing, configuration, dev-ops
- Appendix: Requirements
- Appendix: Instructions for manual testing
Acknowledgements
-
HouseTypeenum methods adapted here with modifications.
Design
![]() Notes about the command format and terminology:
Notes about the command format and terminology:
-
The usage of the term
CLIENTin this guide is general, and represents each Client entity: Buyer, Seller. -
Inputs in
UPPER_CASEare inputs to be supplied by the user.
e.g. Inadd-b n/NAME,NAMEis an input such asadd-b n/Chok Hoe. -
Items in square brackets are optional inputs.
e.g Inn/NAME [t/TAG], the user can inputn/Chok Hoe t/funnyor simplyn/Chok Hoe.
Architecture

The Architecture Diagram given above explains the high-level design of the App.
Given below is a quick overview of main components and how they interact with each other.
Main components of the architecture
Main has two classes called Main and MainApp. It is responsible for,
- At app launch: Initializes the components in the correct sequence, and connects them up with each other.
- At shut down: Shuts down the components and invokes cleanup methods where necessary.
Commons represents a collection of classes used by multiple other components.
The rest of the App consists of four components.
-
UI: The UI of the App. -
Logic: The command executor. -
Model: Holds the data of the App in memory. -
Storage: Reads data from, and writes data to, the hard disk.
How the architecture components interact with each other
The Sequence Diagram below shows how the components interact with each other for the scenario where the user issues the command delete-b 1.
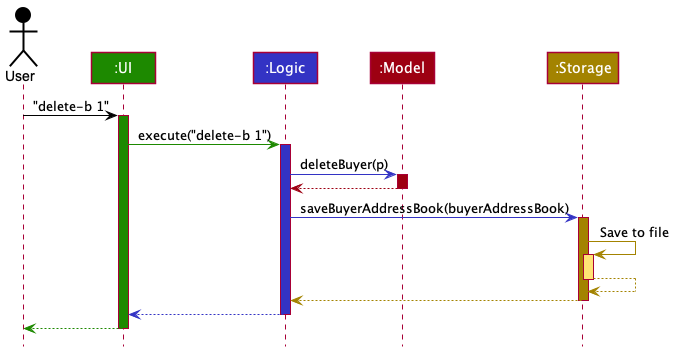
Each of the four main components (also shown in the diagram above),
- defines its API in an
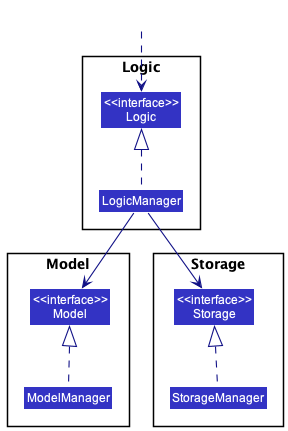
interfacewith the same name as the Component. - implements its functionality using a concrete
{Component Name}Managerclass (which follows the corresponding APIinterfacementioned in the previous point.
For example, the Logic component defines its API in the Logic.java interface and implements its functionality using the LogicManager.java class which follows the Logic interface. Other components interact with a given component through its interface rather than the concrete class (reason: to prevent outside component’s being coupled to the implementation of a component), as illustrated in the (partial) class diagram below.
The sections below give more details of each component.
UI component
The API of this component is specified in Ui.java
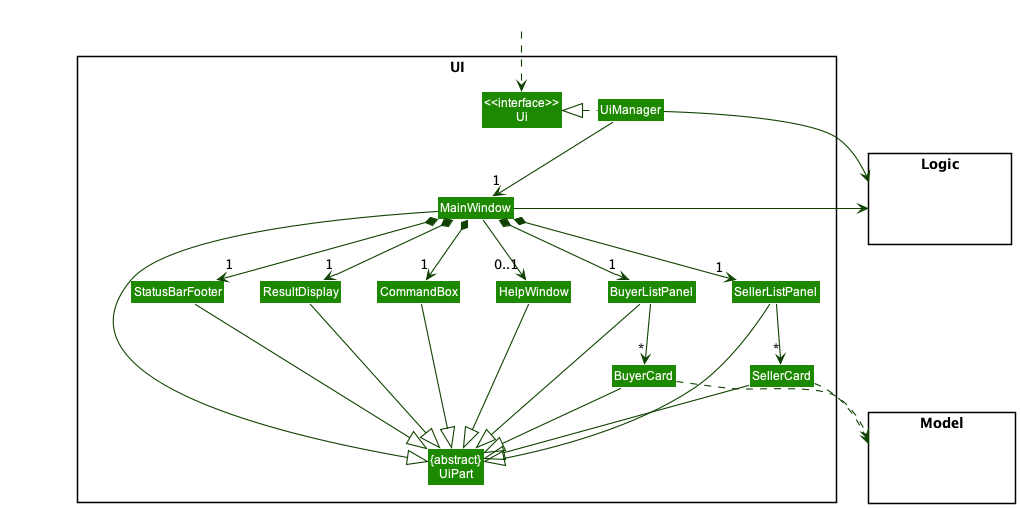
The UI consists of a MainWindow that is made up of parts e.g.CommandBox, ResultDisplay, CLIENTListPanel, StatusBarFooter etc. All these, including the MainWindow, inherit from the abstract UiPart class which captures the commonalities between classes that represent parts of the visible GUI.
The UI component uses the JavaFx UI framework. The layout of these UI parts are defined in matching .fxml files that are in the src/main/resources/view folder. For example, the layout of the MainWindow is specified in MainWindow.fxml
The UI component,
- executes user commands using the
Logiccomponent. - listens for changes to
Modeldata so that the UI can be updated with the modified data. - keeps a reference to the
Logiccomponent, because theUIrelies on theLogicto execute commands. - depends on some classes in the
Modelcomponent, as it displaysCLIENTobject residing in theModel.
Logic component
API : Logic.java
Here’s a (partial) class diagram of the Logic component:

How the Logic component works:
- When
Logicis called upon to execute a command, it uses theAddressBookParserclass to parse the user command. - This results in a
Commandobject (more precisely, an object of one of its subclasses e.g.,AddCommand) which is executed by theLogicManager. - The command can communicate with the
Modelwhen it is executed (e.g. to add a client). - The result of the command execution is encapsulated as a
CommandResultobject which is returned back fromLogic.
The Sequence Diagram below illustrates the interactions within the Logic component for the execute("delete-b 1") API call.
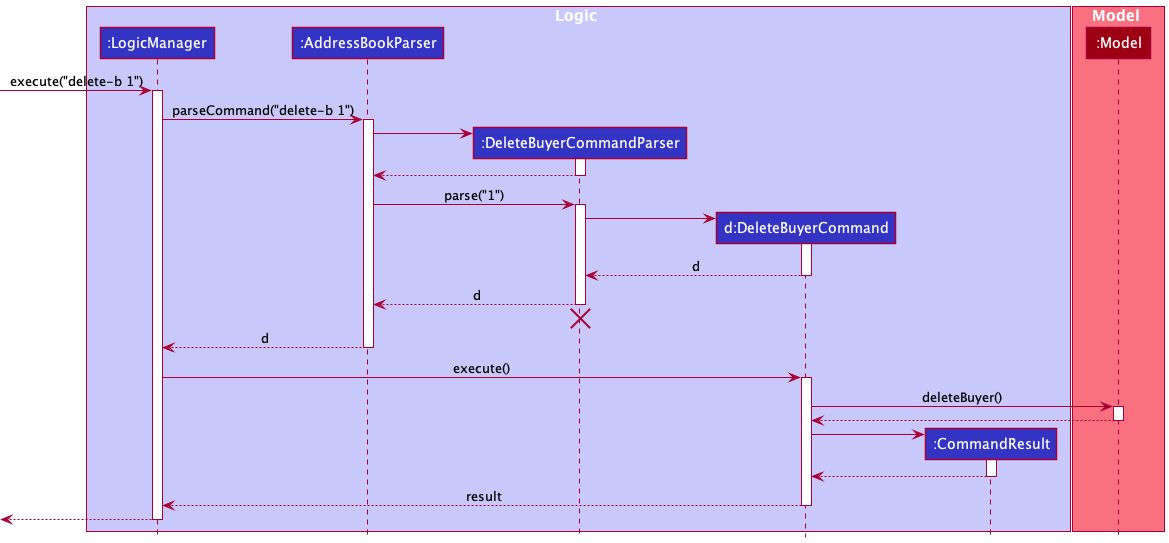
DeleteBuyerCommandParser should end at the destroy marker (X) but due to a limitation of PlantUML, the lifeline reaches the end of diagram.
Here are the other classes in Logic (omitted from the class diagram above) that are used for parsing a user command:
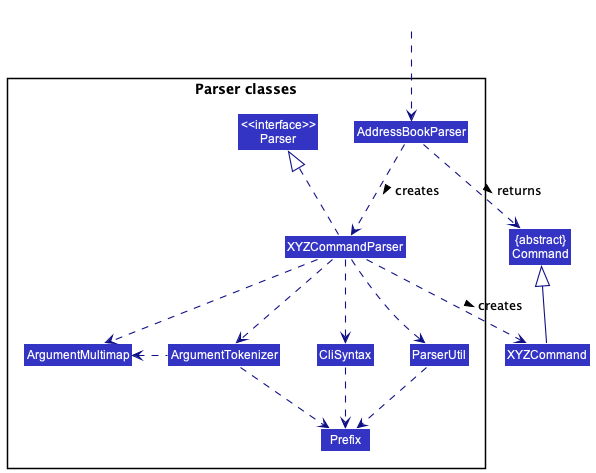
How the parsing works:
- When called upon to parse a user command, the
AddressBookParserclass creates anXYZCommandParser(XYZis a placeholder for the specific command name e.g.,AddBuyerCommandParser) which uses the other classes shown above to parse the user command and create aXYZCommandobject (e.g.,AddBuyerCommand) which theAddressBookParserreturns back as aCommandobject. - All
XYZCommandParserclasses (e.g.,AddBuyerCommandParser,DeleteBuyerCommandParser, …) inherit from theParserinterface so that they can be treated similarly where possible e.g, during testing.
Model component
API : Model.java
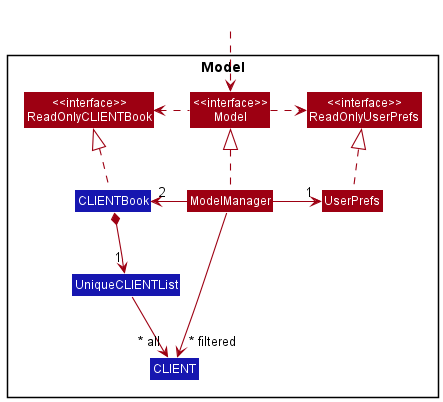
The Model component,
CLIENT in this guide is general, and represents each Client entity: Buyer & Seller.
- stores the address book data i.e., all
CLIENTobjects (which are contained in aUniqueCLIENTListobject). - stores the currently ‘selected’
CLIENTobjects (e.g., results of a search query) as a separate filtered list which is exposed to outsiders as an unmodifiableObservableList<CLIENT>that can be ‘observed’ e.g. the UI can be bound to this list so that the UI automatically updates when data in the list changes. - stores a
UserPrefobject that represents the user’s preferences. This is exposed to the outside as aReadOnlyUserPrefobject. - does not depend on any of the other three components (as the
Modelrepresents data entities of the domain, they should make sense on their own without depending on other components)
Let’s take a look at the internal structure of the CLIENT entity:
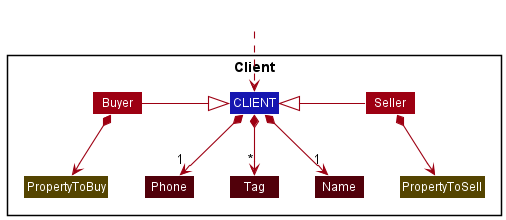
- all
CLIENTobjects (Buyer or Seller) have a name and phone number. -
BuyerhasPropertyToBuywhileSellerhasPropertyToSell.
Now, what PropertyToBuy and PropertyToSell classes encapsulate:
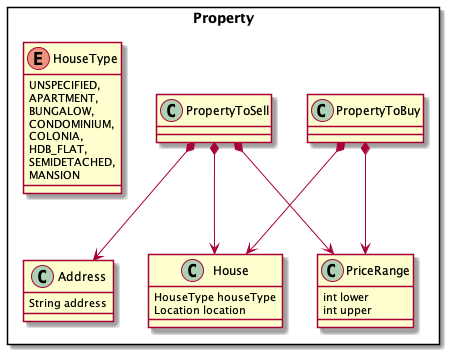
Property class.
This is because sellers know the exact property (and address of the property) that they are selling. One is more general while one is more specific.
We can hence extend the code base more flexibly in the future if we remove some fields from PropertyToBuy or add more fields to PropertyToSell.
Storage component
API : Storage.java
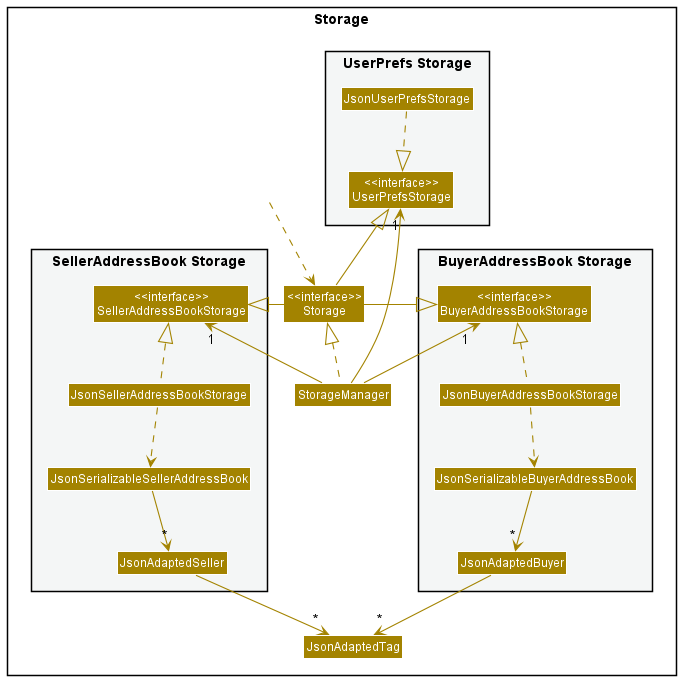
The Storage component,
- can save buyer address book data, seller address book date, and user preference data in json format, and read them back into corresponding objects.
- inherits from
BuyerAddressBookStorage,SellerAddressBookStorageandUserPrefStorage, which means it can be treated as one of those (if only the functionality of only one is needed). - depends on some classes in the
Modelcomponent (because theStoragecomponent’s job is to save/retrieve objects that belong to theModel)
Design Consideration
- Current Design: Having different storage for buyers and sellers
-
Pros: Easier to implement as issues on one side will not affect issues on another. Moreover, when one json file is corrupted, the other json file can still be used.
-
Cons: There will be lots of repetitive code.
- Alternative: Use addressbook.json to contain both buyer and seller list
-
Pros: Less repetitive code
-
Cons: Another layer will be added in the json file, harder to debug and more prone to error.
Common classes
Classes used by multiple components are in the seedu.addressbook.commons package.
Implementation
This section describes some noteworthy details on how certain features are implemented.
Match feature
Implementation
We are currently implementing a Match feature. In implements the following operation:
-
match— Matches a Buyer to a List of Sellers.
Format: match BUYER_INDEX
- The fields are:
-
BUYER_INDEX- index of the Buyer that the user is trying to match with Sellers. Example:match 2
-
Result:
- The list of sellers that match the buyer’s demands will be displayed in the UI.
How match is going to be implemented
-
The match command will match a Buyer with Sellers whose
PropertyToSellmatches the demands of thePropertyToBuyof the buyer. -
How match filters the sellers (How
PropertyToBuymatches withPropertyToSell:- If there exists a price where a buyer is willing to buy and seller is willing to sell for in their respective
buyRangeandsellRange, AND - Their
Houseare equal (i.e, theLocationandHouseTypeof the house matches)- The
Location(case-insensitive) should be equal. - The
HouseTypeof the properties are equal, OR - The buyer’s
HouseTypeisUNSPECIFIED, which means he is okay with any house type.
- The
- If there exists a price where a buyer is willing to buy and seller is willing to sell for in their respective
-
An example:
- buyer’s
PropertyToBuy(afteredit-boradd-b) hasHouse, and buyer is currently at index 2 of UniqueBuyerList.-
Name: Janald -
PropertyToBuy:
-
HouseType:BUNGALOW, -
Location:Serangoonand -
PriceRange:(50 000, 100 000) in dollars
-
-
- a certain seller has
-
Name: Junhong -
ProperyToSell:-
HousewithHouseType:BUNGALOWandLocation:Serangoonas well - His
PriceRangethat he is willing to sell the property for is (99 999, 200 000)
-
-
- In this case, the PropertyToBuy and PropertyToSell can match(same House, and 99 999 - 100 000 dollars is a matching price)
-
match 2will display the list of sellers that match the buyer Janald. As a result, Junhong will be one of the sellers displayed.
- buyer’s
Why match should be implemented
- Our AgentSee application helps housing agents to keep track of their clients efficiently.
- Since there are so many buyers and sellers to keep track of, it would be useful for agents to automate the matching of buyers to sellers.
- The match feature will help agents filter and find a matching property that a buyer wants to buy and a seller wants to sell, which is of great convenience for agents to liase buyers with sellers.
- What buyers look for when buying a Property is its
Location,HouseType, and they have aPriceRangethey are willing to pay for. Therefore, we are implementingmatchsuch that these conditions are met.
Matching to other fields
- We can match buyers with other less strict conditions as well, in case a buyer just wants to take into account a specific criteria.
- For example, we can match buyers and sellers with matching:
- HouseTypes only (example:
COLONIA, Since buyers may be looking only for a specific HouseType, regardless of Location) - Location only (example:
Toa Payoh, Since some buyers may like to buy a Property at a specific area, regardless of other conditions) - PriceRange only (Since buyers may just be looking for properties in their buy range)
- HouseTypes only (example:
- As such, we have a more flexible match feature which would be ideal for agents to match based on their dynamic client demands.
Add Buyer feature
The add-b command mechanism uses similar interactions as shown in the Logic Component. Mainly, it can be broken down into these steps:
Step 1:
The user types input E.g. add-b n/David p/12345678 into the CommandBox (See UI component for more info on CommandBox)
Step 2:
The execute(input) method of LogicManager, a subclass of the Logic component, is called with the given input.
An instance of the AddressBookParser will begin to parse the input into 2 main sections: the command
and the body of the command.
The main job of AddressBookParser at this step is to identify the add-b command which was supplied as the 1st word in the input string.
After which, control is handed over to the AddBuyerCommandParser component by calling its AddBuyerCommandParser#parse(body) method to parse the body which was separated out.
Step 3:
AddBuyerCommandParser#parse(body) verifies if required fields for add-b are present.
In our example, since n/David p/12345678 was included, all required fields are present.
At this step, the new Buyer will have been successfully created. A new AddBuyerCommand with the Buyer is returned to the AddressBookParser to the LogicManager
Step 4:
The LogicManager component then calls AddBuyerCommand#execute(model)method of the new AddBuyerCommandinstance containing the Buyer, with the Modelcomponent created from Model component.
In this method, if the Buyer does not currently already reside in the application, he/she is added into the Model through the Model#addBuyer(Buyer) command and stored in the Model.
(Refer to Model component to see how Buyers are stored into the model)
A new CommandResult representing the successful add-b command is initialized and returned.
Step 5:
LogicManager component will then attempt to update the storage with this new Model through the Storage#saveBuyerAddressBook() method.
Step 6:
Finally, the CommandResultis returned to be displayed by UI component (Refer to Architecture)
The following Sequence Diagrams summarizes the various steps involved:

Edit Buyer feature
For full details on implementation, check out this link
The edit-b / edit-s command mechanism uses a similar interactions as shown in the Logic Component. Mainly, it can be broken down into these steps:
Syntax:
edit-b [index] n/... p/... t/... prop/ h/... l/... pr/...
edit-s [index] n/... p/... t/... prop/ h/... l/... pr/...
Note: All the prefix (like n/, p/, …) are optional, you could omit any of them but at least one prefix should be provided, and the order of prefix does not matter.
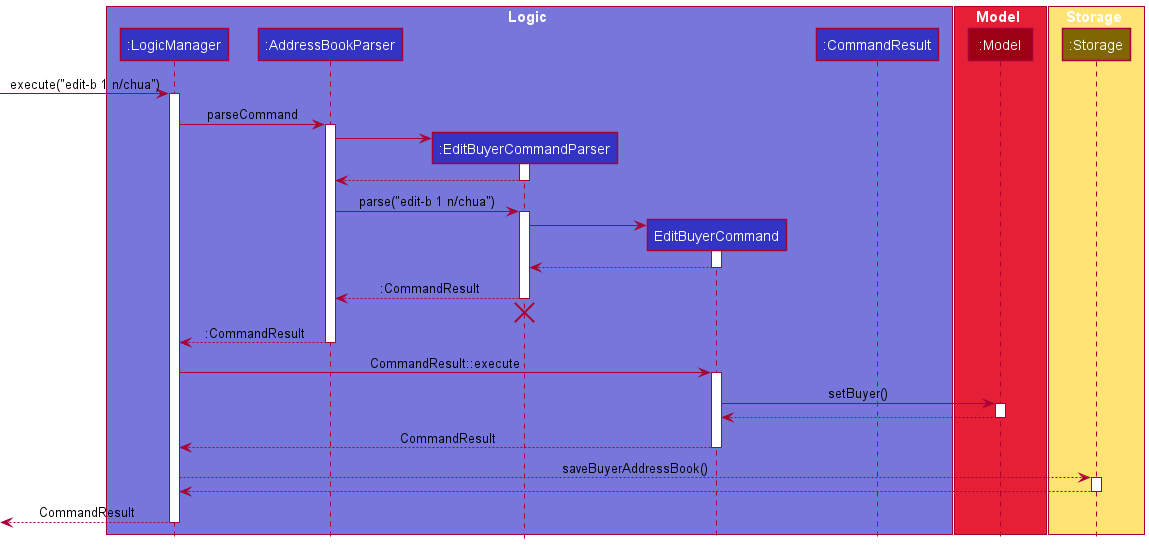
Below are some detailed steps while executing editbuyer / editseller command:
We use edit-b command as an example, the other command’s flow are similar to this command as well.
Step 1:
The user types input E.g. edit-b 1 n/Chua into the CommandBox
Step 2:
Once the user hit Enter, the LogicManager calls execute that takes in everything user typed.
Then, AddressBookParser will investigate the user’s input. It will takes the first keyword: editbuyer and
call the corresponding EditBuyerCommandParser::parse by providing the arguments (anything after than first word) from user input
Step 3:
EditBuyerCommandParser parse the argument provided and check the validity of the arguments. If any argument provided
is not valid, an error will be shown the command won’t be executed.
In our example, 1 n/Chua was provided, the index and at least one require prefix are given, so it is a valid argument.
Step 4:
Now the AddressBookParser returns EditBuyerCommand as CommandResult, the LogicManager then calls
CommandResult::execute.
Step 5:
Now the EditBuyerCommand will execute and do the work, that is updating the corresponding information from the given
index. A CommandResult containing the successful execution result is returned.
Note: The validity of the index will be check at this time, if the index is out of bound, the error will be shown and the edit command will not be executed.
Step 6:
LogicManager component will then update the storage with the edited Model through the
Storage#saveBuyerAddressBook() method.
Step 7:
Finally, the CommandResult is returned to be displayed by UI component (Refer to Architecture)
The Sequence Diagrams below summarizes the various steps involved:
Add property for buyer feature
The add-ptb command uses a similar mechanism as the add-b command mentioned above, with the following differences:
- An index needs to be specified along with the necessary fields
E.g.
add-ptb 1 h/condo l/Serangoon pr/400000,900000 - The Parser (
AddPropertyToBuyCommandParser) checks if the position parsed in is valid (Greater than equal to 1 and smaller than or equal to the size of the displayed buyer list). - The updated buyer remains in the same position as before.
Alternatives considered:
- Given the time, the add property to buy feature can be integrated with the
add-bcommand to allow users to add properties with the buyer, instead of doing it in 2 commands.- Pros:
- More flexibility for experienced users
- Cons:
- More code to implement and test
- Pros:
- Allow for certain fields to be optional if a buyer is yet to give the user the information, but they still wish to add a property first
- Pros:
- More flexible design
- Cons:
- Hard to implement
- Error prone
- Pros:
Appointment feature
The appt-b command uses a similar mechanism as the add-b command mentioned above, with the following differences:
- An index needs to be specified along with the necessary time field. E.g. appt-b 1 time/2023-09-09-09-09
- The Parser (
AppointmentBuyerCommandParser) checks if the position parsed in is valid (Greater than equal to 1 and Smaller than or equal to the size of the displayed buyer list). - The updated buyer remains in the same position as before.
Design Consideration:
- Current: All the properties of time needs to be entered. E.g. The year, month, day, hour and minute should all be present.
- Pros: Less prone to confusion
- Cons: More inputs needed.
-
Alternative 1: Have some option fields such as year and minute.
- Pros: Make the command line input short.
- Cons: Harder to deduce what the user want as the option fields, more prone to mistakes and confusion.
Sort feature
The sort feature allows the user to sort the buyers and sellers by name or time in ascending or descending order.
Due to the symmetric nature of the command for buyer and seller, only sort-b will be discussed.
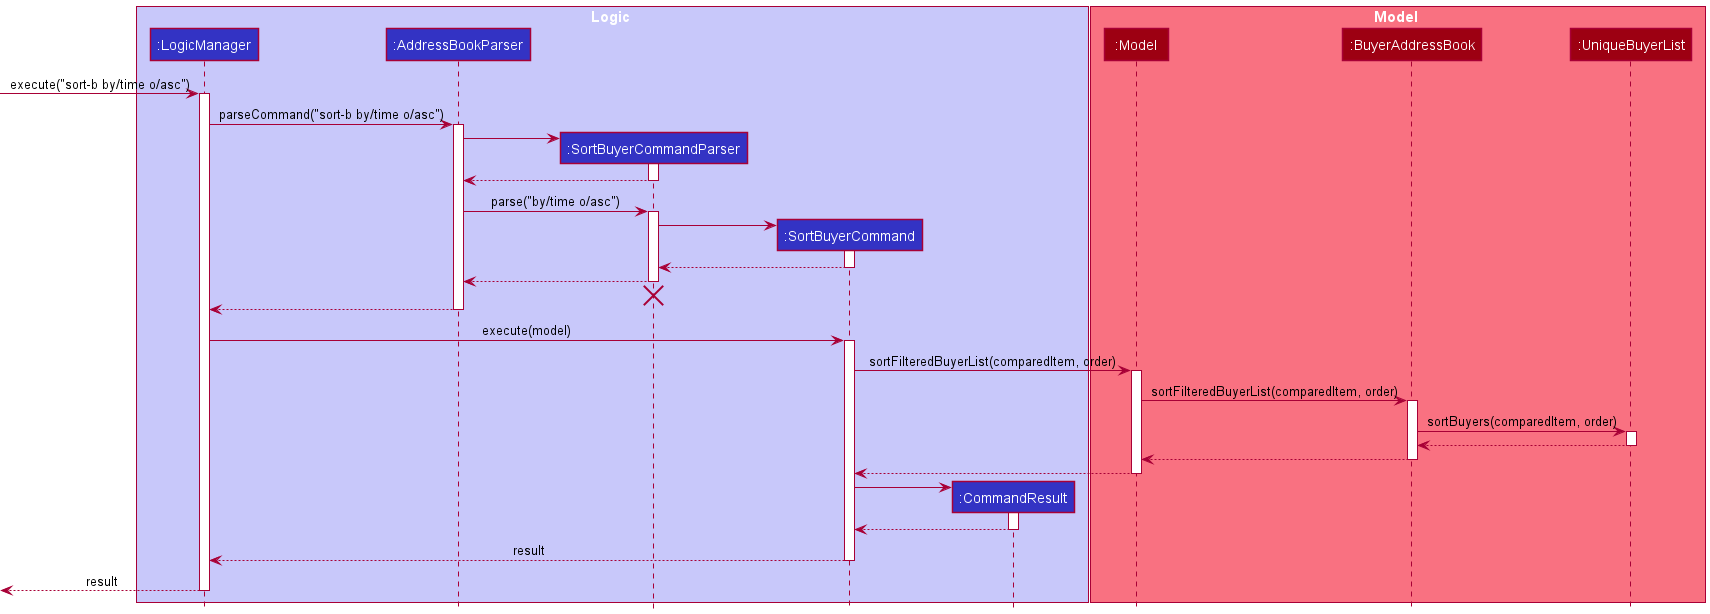
Given below is the steps and the sequence diagram for execution of execute("sort-b by/time o/asc")
Step 1:
The user types input E.g. sort-b by/time o/asc into the CommandBox (See UI component for more info on CommandBox)
Step 2:
AddressBookParser will check if the command is a sort buyer command. The AddressbookParser will then create a SortBuyerCommandParser
Step 3:
SortBuyerCommandParser then checks whether all the prefixes are present and whether the compared item are sortable, and whether the order belongs to either asc or desc. If yes, a SortBuyerCommand is returned.
Step 4:
The execute(model) method of SortBuyerCommand is being called.
Step 5:
The sortFilteredBuyerList(time, asc) method of model is being called, which in turn calls sortFilteredBuyerList(time, asc) method of BuyerAddressBook, which in turn calls sortBuyers(time, asc) from its own copy of UniqueBuyerList.
Step 6:
The sortBuyers(time, asc) alters the UniqueBuyerList’s internalList permanently and sorts it by the compared item and by the given order.
Step 7:
Finally, a CommandResult with the relevant feedback is returned to the LogicManager.
The following Sequence Diagrams summarizes the various steps involved:
Design Considerations:
Current Design: The structure of internal list change permanently, and instead of passing the comparator, the comparedItem and order are passed around in every method call.
Pros:
- It alters the internal list completely, so that the app ‘saves’ users last sorting option.
- Easier to implement to pass the
comparedItemandorderare around.
Cons:
- Some people might not want the sorted result to be saved.
-
comparedItemandorderwill be passed in many layers before reaching theinternalList, less abstraction.
Alternative 1: Sort the list temporarily and maintain the original list in the chronological order.
Pros:
- The functionality seems more natural: when you sort something you might not want the structure of the
internalListto change permanently.
Cons:
- Harder to implement, needs to change the
FilteredListtoSortedListinModelManager.
Alternative 2: Pass a comparator along instead of comparedItem and order
Pros:
- Better abstraction, easier to maintain
Cons:
- Harder to implement, not efficient for sort with limited options.
Clear buyer list/Clear seller list
Implementation
We are currently implementing a clear buyer list and clear seller list function.
Syntax:
-
clear-b- clears the buyer list -
clear-s- clears the seller list -
clear-all- clears both lists
Result:
- specified list is cleared without affecting the other list
Implementation of clear buyer and clear seller
The contents of the buyer list and/or the seller list in model is cleared.
This is done by setting a new BuyerAddressBook and/or SellerAddressBook in our model.
Why is it implemented this way
The user has more options to selectively clear specified books in contrast to AB3 where the old clear command clears the entire addressbook without discretion.
Alternatives
A copy of the uncleared list is kept, next the content of the whole addressbook can be cleared by using clear-all, followed by loading of the uncleared content.
Find buyer/Find seller
Syntax:
find-b DELIMITER/KEYWORD [MORE_KEYWORDS]find-s DELIMITER/KEYWORD [MORE_KEYWORDS]
Examples:
-
find-b n/junhong junhengsearches for buyers with junhong or junheng in their name -
find-s h/hdb 5roomsearches for sellers whose house types has HDB and 5 room in their name (i.e. 5 room HDB).
Result:
returns a filtered list of sellers or buyers
Implementation of find buyer and find seller
The find-s and find-b command first goes through parsing by FindBuyerCommandParser or FindSellerCommandParser, parsing the DELIMITER and keywords to create a predicate. For example, inputting find-b l/Bishan creates a BuyerLocationContainsKeywordPredicate predicate with KEYWORDS as parameters.
Next, said predicate is passed into FindBuyerCommand or FindSellerCommand. This function would then call updateFilteredSellerList or updateFilteredBuyerList of model and filters the list based on the given predicate. The commands then calls getFilteredSellerList or getFilteredBuyerList
in order to return the filtered list of sellers or buyers, whichever specified by the command.
Why is it implemented this way
Having a seperate buyer and seller list means we need to seperate the find command into find buyer and find seller in order to filter the desired list. Having seperate address books helps in this regard as the version of getFilteredBuyerList or getFilteredSellerList can be used.
List buyer/List seller
Syntax:
list-blist-s
Examples:
-
list-blists all current buyers -
list-slists all current sellers
Result:
returns an unfiltered list of sellers or buyers
Implementation of list buyer and list seller
The updateFilteredBuyerList or updateFilteredSellerList of model is called, with parameters PREDICATE_SHOW_ALL_BUYERS. This will list the unfiltered buyer or seller list, whichever specified
Why is it implemented this way
Having a seperate buyer and seller list means we need to seperate the list command into list buyer and list seller in order to show the desired list. Having seperate address books helps in this regard as the version of updateFilteredBuyerList or updateFilteredSellerList can be used.
Documentation, logging, testing, configuration, dev-ops
Appendix: Requirements
Product scope
Target user profile:
- real estate agent
- has a need to manage clients in an organized fashion
- mainly uses desktop for work
- prefers typing to mouse interactions
- is reasonably comfortable using CLI apps
Value proposition: Able to keep track of client’s preferences, housing details and budget
User stories
Priorities: High (must have) - * * *, Medium (nice to have) - * *, Low (unlikely to have) - *
| Priority | As a … | I want to … | So that I can… |
|---|---|---|---|
* * * |
new user | see usage instructions | refer to instructions when I forget how to use the App |
* * * |
user | add a new client | |
* * * |
user | delete a client | remove entries that I no longer need |
* * * |
user | find a client by name | locate details of clients without having to go through the entire list |
* * |
user | hide private contact details | minimize chance of someone else seeing them by accident |
* |
user with many clients in the address book | sort clients by name | locate a client easily |
* * * |
housing agent with many clients | view client details fast | can deal with customers easily when they contact me |
* * * |
housing agent | add a new client quickly with a quick description | update my client list efficiently |
* * * |
housing agent | see relevant information about my clients | understand their needs |
* * * |
housing agent | edit my client data | stay in touch with their changing needs |
* * * |
housing agent | delete a client when their house has been sold or after they have bought a house | not mix up information in the future |
* * * |
housing agent | access some of my favourite clients quickly | always focus on them |
* * * |
housing agent | “tag” my clients with custom text | remember every client easily |
* * * |
housing agent with too many clients | be able to find a client by name | locate them easily and quickly |
* * |
housing agent | have access to my search history | look up my recently contacted clients |
* * |
new user | have a quick guide to start me off | learn how to use the application |
* * |
housing agent | check my important deadlines | avoid missing important meetings with my clients |
{More to be added}
Use cases
(For all use cases below, the System is AgentSee and the Actor is the user, unless specified otherwise)
Use case: Delete a seller
MSS
- User requests to list sellers
- System shows a list of sellers
- User requests to delete a specific seller in the list
- System deletes the seller
Use case ends
Extensions
- 3a. System detects an error in User input.
-
3a1. System shows an error message.
Use case resumes from step 3.
-
Use case: Add a seller
MSS
- User types in seller information
- System adds the new seller
Use case ends
Extensions
-
1a. System detects an error in User input.
-
1a1. System shows an error message.
Use case resumes from step 1.
-
{More to be added}
Non-Functional Requirements
- Should work on any mainstream OS as long as it has Java
11or above installed. - Should be able to hold up to 1000 clients without a noticeable sluggishness in performance for typical usage.
- A user with above average typing speed for regular English text (i.e. not code, not system admin commands) should be able to accomplish most of the tasks faster using commands than using the mouse.
- Essential: Technical: Should work on any mainstream OS as long as it has Java
11or above installed. - Typical: Performance: Should be able to hold up to 1000 clients without a noticeable sluggishness in performance for typical usage.
- Typical: A user with above average typing speed for regular English text (i.e. not code, not system admin commands) should be able to accomplish most of the tasks faster using commands than using the mouse.
- Essential” Technical: Should work on both 32-bit and 64-bit environments.
- Novel: Quality: Should be usable by a novice who is not extremely tech savvy.
- Typical: Scalability: Features and improvements should be easy to implement iteratively.
- Typical: Constraints: Minimal mouse clicking to interact with Ui.
- Essential: Process requirements: the project is expected to adhere to a schedule that delivers a feature set according to the module requirements.
- Typical: Business/domain: Clients should be unique; they cannot have the exact same fields.
- Notes about project scope: the product is not required to handle any sort of physical printing (e.g client list hardcopy).
- Typical: Disaster recovery: If user makes a mistake on his client list, he should be able to recover from the mistake quickly without too much stress.
{More to be added}
Glossary
- Mainstream OS: Windows, Linux, Unix, OS-X
- Private contact detail: A contact detail that is not meant to be shared with others
- Real estate agent: Agent who is the medium that manages clients, and is the target persona for our product.
-
Client:
Buyerswho is looking to buy their property andSellerswho is looking to sell their property. - Address: Address of the Property that Sellers are trying to sell.
- Property: The property that the buyer is looking to buy/ seller is looking to sell.
Appendix: Instructions for manual testing
Given below are instructions to test the app manually.
Launch and shutdown
-
Initial launch
- Download the jar file and copy into an empty folder
- Run
java -jar addressbook.jarin the directory containing the jar file. - Alternatively, double-click the jar file Expected: Shows the GUI with a set of sample contacts. The window size may not be optimum.
-
Saving window preferences
-
Resize the window to an optimum size. Move the window to a different location. Close the window.
-
Re-launch the app by double-clicking the jar file.
Expected: The most recent window size and location is retained.
-
Saving data
-
Dealing with missing/corrupted data files
example JSON format of the
buyeraddressbook.jsonandselleraddressbook:buyeraddressbook.json:{ "buyers" : [ { "name" : "Shi Hong", "phone" : "12345678", "appointment" : "2022-03-31-17-00", "tagged" : [ "smart" ], "propertyToBuy" : { "house" : { "houseType" : "Bungalow", "location" : "clementi" }, "priceRange" : { "lower" : "500000", "upper" : "600000" } } }, { "name" : "Jun Hong", "phone" : "87654321", "appointment" : "", "tagged" : [ ], "propertyToBuy" : null } }selleraddressbook.json:{ "sellers" : [ { "name" : "chua", "phone" : "1234", "appointment" : "", "tagged" : [ "tag1", "tag2" ], "propertyToSell" : { "house" : { "houseType" : "Bungalow", "location" : "cueens town" }, "priceRange" : { "lower" : "24", "upper" : "48" }, "address" : "Utown" } }, { "name" : "Ben Leong", "phone" : "87654321", "appointment" : "", "tagged" : [ "friendly" ], "propertyToSell" : null } }- Any of the following situation will cause the file to be broken and will start with empty buyer address book/ seller address book:
- The
"sellers"/"buyers"tag is spelled wrongly - The bracket
{and}is not closed well - the
"name"/phone/appointmentisnull - The format of the
nameis incorrect, i.e. chua@hong, pikaso_lim… - The format of the
phoneis incorrect, i.e. not a number format, less than 3 digits - The format of the appointment is incorrect, i.e. not in the correct form yyyy-MM-dd-HH-mm (This will not let the app start correctly)
- The
"tagged"field is not covered with[and] - The
"propertyToBuy"/"propertyToSell"format is wrong,correct format should be eithernullor JSON format as shown above.- If
"houseType"is putnull(It is considered as corrupted file and the app would not start). -
"priceRange":
- If
- The
"lower"is more than"upper"value, i.e."lower">"upper" - Any of the following situation will cause the file to be broken and will start with empty buyer address book/ seller address book: